Creating a Custom Java Desktop Database Application
Note: The current release is NetBeans IDE 6.5. If you are using NetBeans IDE 6.5, see Creating a Custom Java Desktop Database Application in NetBeans IDE 6.5.
This tutorial guides you through the creation of a complete desktop database application that enables its user to browse and edit customer records and purchase history. The resulting application includes the following main features:
- A main view that enables users to browse customer records and customer purchases.
- A search field for the customer records.
- Separate dialog boxes for entering new records or modifying existing records.
- Code to interact with multiple related database tables.
- Introduction
- Setting Up the Database
- Creating the Application Skeleton
- Customizing the Master/Detail View
- Adding Dialog Boxes
- Activating the Save and Cancel Buttons in the Dialog Boxes
- Currency Rendering, Date Verifying, and Search
- See Also
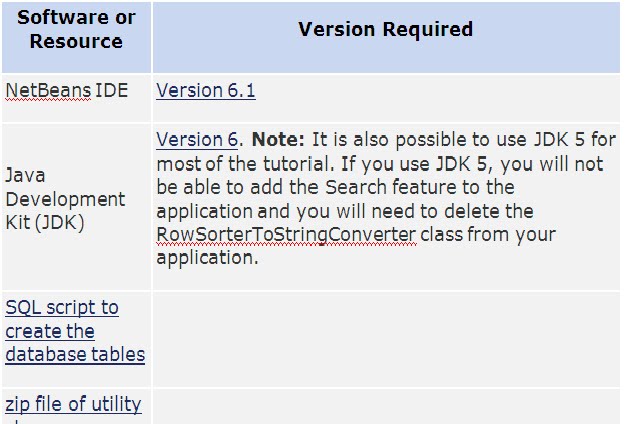
To follow this tutorial, you need the following software and resources.
Software or Resource Version Required
NetBeans IDE Version 6.1
Note: You can download the final working project created in this tutorial at any time and open it in the IDE to view the classes. If you want to run the downloaded project, be sure to clean and build it before running.
Introduction
This application takes advantage of the following technologies:
- The Java Persistence API (JPA), which helps you interact with a database using Java code.
- Beans Binding, which enables you to keep Swing component properties synchronized.
- The Swing Application Framework, which simplifies basic application functions such as persisting session nformation, handling actions, and managing resources.
The tutorial makes use of IDE wizards and other code generation features to provide much of the boilerplate code. It also shows you how to customize the generated code and hand code other parts of the application.
This tutorial takes approximately 2 hours to complete. For a shorter tutorial that shows the creation of a less customized user interface, see Building a Java Desktop Database Application.
Below is a screenshot of the working application that you will have when you complete the tutorial.

Before creating any application code, we will set up the database. We will then be able to take advantage of wizards that generate much of the application code based on the structure of the database.
The instructions in this tutorial are based using a MySQL database that you create with this SQL script. Your MySQL installation needs to use the InnoDB storage engine in order to handle the foreign keys in this database. MySQL's default storage engine, MyISAM, will not work with this tutorial.
Note: You can use other database management software, but doing so might require making some adjustments to the SQL script. In addition, you will need to create the database from outside of the IDE.
To set up the IDE to work with MySQL databases, see the Connecting to a MySQL Database page.
To create the database:
- In the Services window, right-click the MySQL Server node and choose Start.
- Right-click the MySQL Server node and choose Create Database. If the Create Database item isn't enabled, choose Connect. You might then need to enter a password. The Create Database item should then be enabled.
The database structure was designed with normalization and referential integrity in mind. Here are some notes on the structure:
- The data is split among several tables to reduce duplication and the possibility for inconsistencies. Some tables are connected to each other through foreign keys.
- All of the tables use MySQL's AUTO_INCREMENT attribute so that there is a unique identifier for each row in those tables. This identifier is created by the database management software, so your application and/or your application's user do not have to create this identifier. (For AUTO_INCREMENT to work properly within the application, you need to add the @GeneratedValue(strategy=GenerationType.IDENTITY annotation for that column in the table's entity class. Otherwise, the application does not try to submit a value for that column when you create a new record.)
- The foreign key in the ORDERS table is there to link each order record with a customer. In the application's user interface, ORDER records are only displayed for the selected CUSTOMER.
- The ON CASCADE DELETE attribute for the foreign key to the CUSTOMERS class ensures that a customer's orders are also deleted when a customer is deleted.
- The foreign key in the CUSTOMERS table points to a COUNTRIES table. We will use this relationship in the application to enable the user to select a customer's country from a combo box.
- The ORDERS table has a foreign key to the PRODUCTS table. When adding a new order record, the user will be able to choose a product from a combo box.
- The COUNTRIES and PRODUCTS tables are pre-populated with data so that you can choose from those tables when the user of the application is adding customer and order records.
- Though this tutorial does not cover it, you might find it useful to create separate applications to populate the COUNTRIES and PRODUCTS tables. Such applications could be created with the Java Desktop Application project template and would not require additional hand-coding.
We will use the IDE's Java Desktop Application project template to create much of the base code for the application. This template generates code for the following features:
- Connection to the database.
- A main application frame that contains tables for customer details and customer orders.
- A main application class that handles basic application life-cycle functions, including persisting of window state between sessions and resource injection.
- Actions (and corresponding buttons) for standard database application commands.
For some database structures, you can get a working application as soon as you exit the wizard. However, in this tutorial we use some constructs for which you need to customize the generated code, such as AUTO-INCREMENT and one-to-many relationships.
To create the application skeleton:
- Choose File > New Project.
- Select the Java category and the Java Desktop Application template. Then click Next.
- In the Name and Location page of the wizard, follow these steps:
- Type CustomerRecords in the Project Name field.
- Select the Database Application shell.
- Click Next.
- In the Master Table page of the wizard, follow these steps:
- Select the connection to the just-created MyBusinessRecords database.
- Select the CUSTOMERS table.
- Move the ID entry from the Columns to Include column to Available Columns.
- Click Next.
- In the Detail Options page, follow these steps:
- Click the Table radio button to create a JTable for the ORDERS table.
- Move the ID entry from the Columns to Include column to Available Columns.
- Click Finish to exit the wizard.


- The Customers and Orders entity classes, which represent the data from the CUSTOMERS AND ORDERS database tables.
- The main form with two JTable components that provide a master/detail view of the CUSTOMERS and ORDERS database


0 comments:
Post a Comment